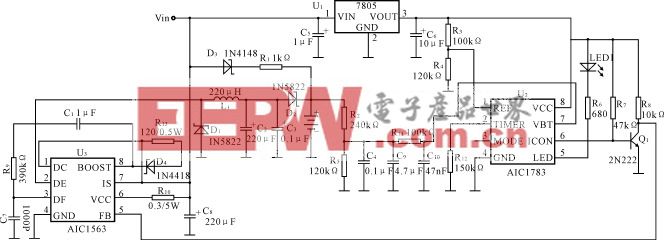
MAX1233/MAX1234触摸屏控制器入门

$ 2 AE 18
$ 2 AE 19
$ 2 AE 1A
$ 2 AE 1B
$ 2 AE 28
$ 2 AE 29
$ 2 AE 2A
$ 2 AE 2B
$ 2 AE 38
$ 2 AE 39
$ 2 AE 3A
$ 2 AE 3B
$ 2 AF xx
$ 3 AF xx xx
$ 4 AF xx xx xx
$ 5 AF xx xx xx xx
$ 2 F9 0
$ 2 F9 1
表25. 更新后MINIQUSB+固件01.05.41中的中断脉冲累加器命令
DEMO1234 Command | Action | Int | GPIO Input | Firmware Command |
$ 2 C3 00 | Query which of the C3 commands are supported; the return value is a 2-byte bitmap of commands C300 to C30F, msb first | — | — | C3 00 |
I Q 0 | Query configuration of pulse accumulator | INT0 | GPIO-K5 | C3 01 00 |
I Q 1 | Query configuration of pulse accumulator | INT1 | GPIO-K6 | C3 01 01 |
I Q 2 | Query configuration of pulse accumulator | INT2 | GPIO-K7 | C3 01 02 |
I Q 3 | Query configuration of pulse accumulator | INT3 | GPIO-K8 | C3 01 03 |
I C 0 0 | Configure pulse accumulator: disable interrupt | INT0 | GPIO-K5 | C3 02 00 00 |
I C 1 0 | Configure pulse accumulator: disable interrupt | INT1 | GPIO-K6 | C3 02 01 00 |
I C 2 0 | Configure pulse accumulator: disable interrupt | INT2 | GPIO-K7 | C3 02 02 00 |
I C 3 0 | Configure pulse accumulator: disable interrupt | INT3 | GPIO-K8 | C3 02 03 00 |
I C 0 1 | Configure pulse accumulator: rising-edge trigger | INT0 | GPIO-K5 | C3 02 00 01 |
I C 1 1 | Configure pulse accumulator: rising-edge trigger | INT1 | GPIO-K6 | C3 02 01 01 |
I C 2 1 | Configure pulse accumulator: rising-edge trigger | INT2 | GPIO-K7 | C3 02 02 01 |
I C 3 1 | Configure pulse accumulator: rising-edge trigger | INT3 | GPIO-K8 | C3 02 03 01 |
I C 0 3 | Configure pulse accumulator: falling-edge trigger | INT0 | GPIO-K5 | C3 02 00 03 |
I C 1 3 | Configure pulse accumulator: falling-edge trigger | INT1 | GPIO-K6 | C3 02 01 03 |
I C 2 3 | Configure pulse accumulator: falling-edge trigger | INT2 | GPIO-K7 | C3 02 02 03 |
I C 3 3 | Configure pulse accumulator: falling-edge trigger | INT3 | GPIO-K8 | C3 02 03 03 |
I R 0 | Read pulse accumulator | INT0 | GPIO-K5 | C3 03 00 |
I R 1 | Read pulse accumulator | INT1 | GPIO-K6 | C3 03 01 |
I R 2 | Read pulse accumulator | INT2 | GPIO-K7 | C3 03 02 |
I R 3 | Read pulse accumulator | INT3 | GPIO-K8 | C3 03 03 |
I 0 0 | Clear pulse accumulator | INT0 | GPIO-K5 | C3 04 00 |
I 0 1 | Clear pulse accumulator | INT1 | GPIO-K6 | C3 04 01 |
I 0 2 | Clear pulse accumulator | INT2 | GPIO-K7 | C3 04 02 |
I 0 3 | Clear pulse accumulator | INT3 | GPIO-K8 | C3 04 03 |
I S 0 xx | Set pulse accumulator count xx = 0 to 255 | INT0 | GPIO-K5 | C3 05 00 xx |
I S 1 xx | Set pulse accumulator count xx = 0 to 255 | INT1 | GPIO-K6 | C3 05 01 xx |
I S 2 xx | Set pulse accumulator count xx = 0 to 255 | INT2 | GPIO-K7 | C3 05 02 xx |
I S 3 xx | Set pulse accumulator count xx = 0 to 255 | INT3 | GPIO-K8 | C3 05 03 xx |


评论