GPU如何训练大批量模型?方法在这里
分布式训练:在多台机器上训练
本文引用地址:http://www.eepw.com.cn/article/201810/393173.htm在更大的批量上训练时,我们要如何控制多个服务器的算力呢?
最简单的选择是使用 PyTorch 的 DistributedDataParallel,它几乎可以说是以上讨论的 DataParallel 的直接替代元件。
但要注意:尽管代码看起来很相似,但在分布式设定中训练模型要改变工作流程,因为你必须在每个节点上启动一个独立的 Python 训练脚本。正如我们将看到的,一旦启动,这些训练脚本可以通过使用 PyTorch 分布式后端一起同步化。
在实践中,这意味着每个训练脚本将拥有:
它自己的优化器,并在每次迭代中执行一个完整的优化步骤,不需要进行参数传播(DataParallel 中的步骤 2);
一个独立的 Python 解释器:这也将避免 GIL-freeze,这是在单个 Python 解释器上驱动多个并行执行线程时会出现的问题。
当多个并行前向调用由单个解释器驱动时,在前向传播中大量使用 Python 循环/调用的模型可能会被 Python 解释器的 GIL 放慢速度。通过这种设置,DistributedDataParallel 甚至在单台机器设置中也能很方便地替代 DataParallel。
现在我们直接讨论代码和用途。
DistributedDataParallel 是建立在 torch.distributed 包之上的,这个包可以为同步分布式运算提供低级原语,并能以不同的性能使用多种后端(tcp、gloo、mpi、nccl)。在这篇文章中,我将选择一种简单的开箱即用的方式来使用它,但你应该阅读文档和 Séb Arnold 写的教程来深入理解这个模块。
文档:https://pytorch.org/docs/stable/distributed.html
教程:https://pytorch.org/tutorials/intermediate/dist_tuto.html
我们将考虑使用具有两个 4 - GPU 服务器(节点)的简单但通用的设置:
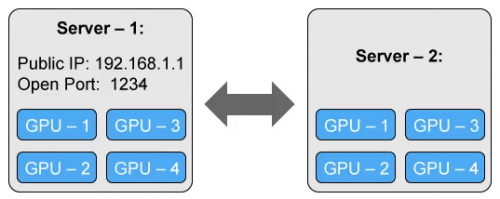
主服务器(服务器 1)拥有一个可访问的 IP 地址和一个用于通信的开放端口。
改写 Python 训练脚本以适应分布式训练
首先我们需要改写脚本,从而令其可以在每台机器(节点)上独立运行。我们将实现完全的分布式训练,并在每个节点的每块 GPU 上运行一个独立的进程,因此总共需要 8 个进程。
我们的训练脚本有点长,因为需要为同步化初始化分布式后端,封装模型并准备数据,以在数据的一个子集上来训练每个进程(每个进程都是独立的,因此我们需要自行处理)。以下是更新后的代码:
from torch.utils.data.distributed import DistributedSampler
from torch.utils.data import DataLoader
# Each process runs on 1 GPU device specified by the local_rank argument.
parser = argparse.ArgumentParser()
parser.add_argument("--local_rank", type=int)
args = parser.parse_args()
# Initializes the distributed backend which will take care of sychronizing nodes/GPUs
torch.distributed.init_process_group(backend='nccl')
# Encapsulate the model on the GPU assigned to the current process
device = torch.device('cuda', arg.local_rank)
model = model.to(device)
distrib_model = torch.nn.parallel.DistributedDataParallel(model,
device_ids=[args.local_rank],
output_device=args.local_rank)
# Restricts data loading to a subset of the dataset exclusive to the current process
sampler = DistributedSampler(dataset)
dataloader = DataLoader(dataset, sampler=sampler)
for inputs, labels in dataloader:
predictions = distrib_model(inputs.to(device)) # Forward pass
loss = loss_function(predictions, labels.to(device)) # Compute loss function
loss.backward() # Backward pass
optimizer.step() # Optimizer step
启动 Python 训练脚本的多个实例
我们就快完成了,只需要在每个服务器上启动训练脚本的一个实例。
为了运行脚本,我们将使用 PyTorch 的 torch.distributed.launch 工具。它将用来设置环境变量,并用正确的 local_rank 参数调用每个脚本。
第一台机器是最主要的,它应该对于所有其它机器都是可访问的,因此拥有一个可访问的 IP 地址(我们的案例中是 192.168.1.1)以及一个开放端口(在我们的案例中是 1234)。在第一台机器上,我们使用 torch.distributed.launch 来运行训练脚本:
python -m torch.distributed.launch --nproc_per_node=4 --nnodes=2 --node_rank=0 --master_addr="192.168.1.1" --master_port=1234 OUR_TRAINING_SCRIPT.py (--arg1 --arg2 --arg3 and all other arguments of our training script) # Optimizer step
在第二台机器上,我们类似地启动脚本:
python -m torch.distributed.launch --nproc_per_node=4 --nnodes=2 --node_rank=1 --master_addr="192.168.1.1" --master_port=1234 OUR_TRAINING_SCRIPT.py (--arg1 --arg2 --arg3 and all other arguments of our training script)
这两个命令是相同的,除了—node_rank 参数,其在第一台机器上被设为 0,在第二台机器上被设为 1(如果再加一台机器,则设为 2,以此类推…)。


评论